一. 概述
Sentinel客户端默认情况下接收到 Dashboard 推送的规则配置后,可以实时生效。但是有一个致命缺陷,Dashboard和业务服务并没有持久化这些配置,当业务服务重启后,这些规则配置将全部丢失。
Sentinel 提供两种方式修改规则:
- 通过 API 直接修改 (
loadRules)
- 通过
DataSource 适配不同数据源修改
通过 API 修改比较直观,可以通过以下几个 API 修改不同的规则:
1
2
| FlowRuleManager.loadRules(List<FlowRule> rules);
DegradeRuleManager.loadRules(List<DegradeRule> rules);
|
手动修改规则(硬编码方式)一般仅用于测试和演示,生产上一般通过动态规则源的方式来动态管理规则。
上述 loadRules() 方法只接受内存态的规则对象,但更多时候规则存储在文件、数据库或者配置中心当中。DataSource 接口给我们提供了对接任意配置源的能力。相比直接通过 API 修改规则,实现 DataSource 接口是更加可靠的做法。
我们推荐通过控制台设置规则后将规则推送到统一的规则中心,客户端实现 ReadableDataSource 接口端监听规则中心实时获取变更,流程如下:
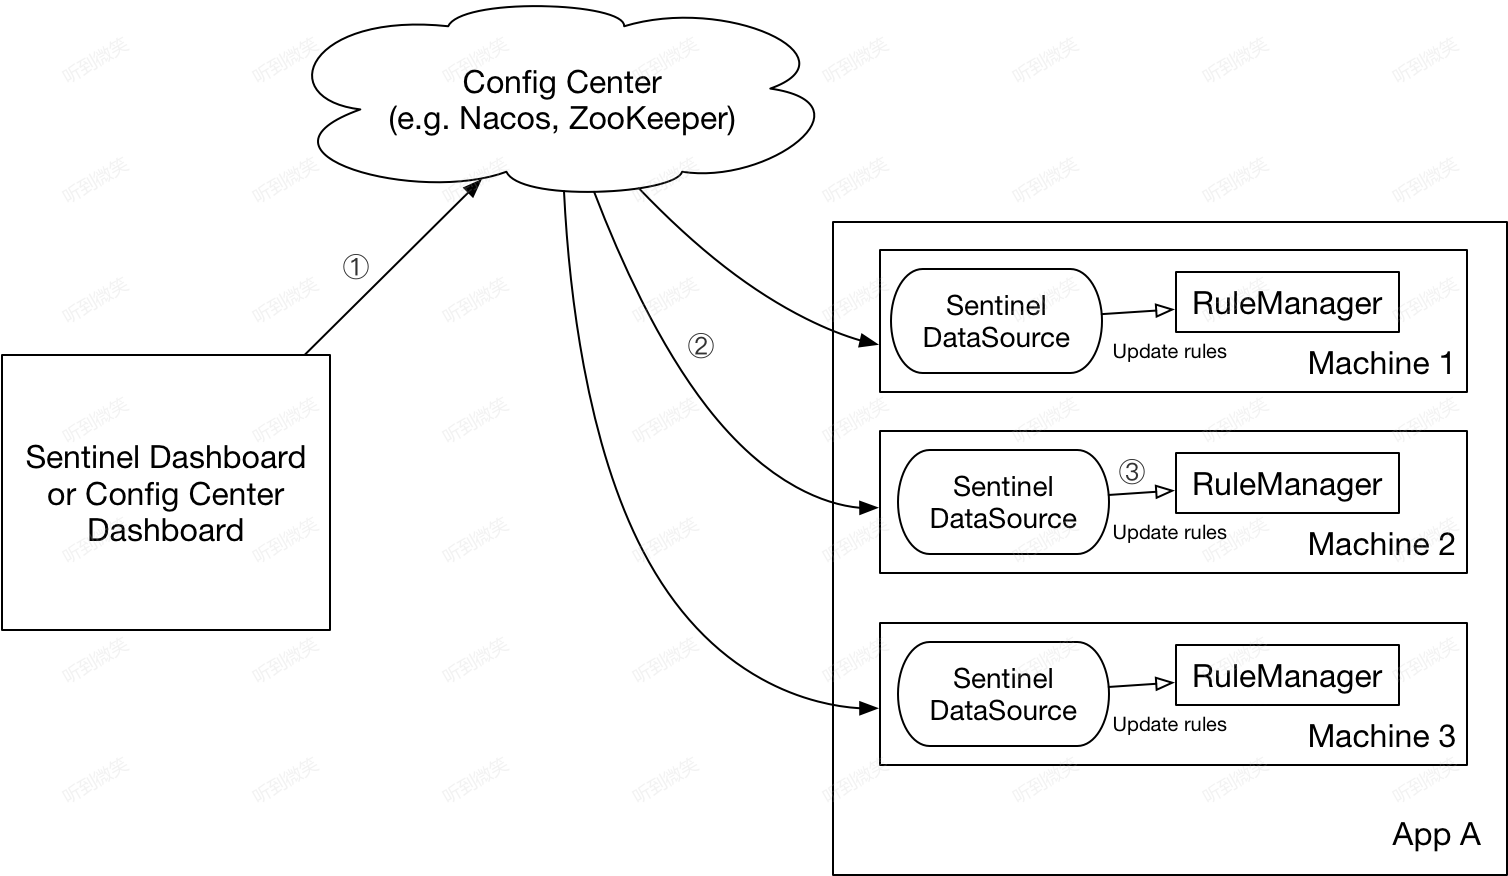
DataSource 扩展常见的实现方式有:
- 拉模式:客户端主动向某个规则管理中心定期轮询拉取规则,这个规则中心可以是 RDBMS、文件,甚至是 VCS 等。这样做的方式是简单,缺点是无法及时获取变更;
- 推模式:规则中心统一推送,客户端通过注册监听器的方式时刻监听变化,比如使用 Nacos、Zookeeper 等配置中心。这种方式有更好的实时性和一致性保证。
Sentinel 目前支持以下数据源扩展:
Sentinel开源版在Push模式下只实现了 路径2,也就是Nacos到业务服务之间的规则同步;路径1 Dashboard配置修改写入Nacos并没有实现,在后文中我们会介绍如何修改 Dashboard 源码完成配置的写入。
二. 从 Nacos 加载规则配置
首先,我们先来看看如何使用Sentinel官方提供的 sentinel-datasource-nacos 从Nacos加载规则配置。
第一步:引入依赖
1
2
3
4
5
| <dependency>
<groupId>com.alibaba.csp</groupId>
<artifactId>sentinel-datasource-nacos</artifactId>
<version>1.8.6</version>
</dependency>
|
第二步:配置规则自动加载
1
2
3
4
5
6
7
8
9
10
11
12
13
14
15
16
17
18
19
20
21
22
23
24
25
26
27
28
29
30
31
32
33
34
35
36
37
38
39
| package cn.bigcoder.demo.sentinel.sentineldemo.demos.config;
import com.alibaba.csp.sentinel.datasource.ReadableDataSource;
import com.alibaba.csp.sentinel.datasource.nacos.NacosDataSource;
import com.alibaba.csp.sentinel.slots.block.flow.FlowRule;
import com.alibaba.csp.sentinel.slots.block.flow.FlowRuleManager;
import com.alibaba.fastjson.JSON;
import com.alibaba.fastjson.TypeReference;
import com.alibaba.nacos.api.PropertyKeyConst;
import java.util.List;
import java.util.Properties;
import org.springframework.context.ApplicationListener;
import org.springframework.context.event.ContextRefreshedEvent;
import org.springframework.stereotype.Component;
@Component
public class SentinelRuleConfiguration implements ApplicationListener<ContextRefreshedEvent> {
private static final String remoteAddress = "10.10.10.12:8848";
private static final String groupId = "SENTINEL_GROUP";
private static final String dataId = "sentinel-demo";
private static final String NACOS_NAMESPACE_ID = "SENTINEL";
@Override
public void onApplicationEvent(ContextRefreshedEvent event) {
Properties properties = new Properties();
properties.put(PropertyKeyConst.SERVER_ADDR, remoteAddress);
ReadableDataSource<String, List<FlowRule>> flowRuleDataSource = new NacosDataSource<>(properties, groupId,
dataId,
source -> JSON.parseObject(source, new TypeReference<List<FlowRule>>() {
}));
FlowRuleManager.register2Property(flowRuleDataSource.getProperty());
}
}
|
第三步:往Nacos中写入配置
1
2
3
4
5
6
7
8
9
10
11
12
13
14
15
16
17
18
19
20
21
22
23
24
25
26
27
28
29
30
31
| import com.alibaba.nacos.api.NacosFactory;
import com.alibaba.nacos.api.PropertyKeyConst;
import com.alibaba.nacos.api.config.ConfigService;
import java.util.Properties;
public class NacosConfigSender {
public static void main(String[] args) throws Exception {
final String groupId = "SENTINEL_GROUP";
final String dataId = "sentinel-demo-flow-rules";
Properties properties = new Properties();
properties.put(PropertyKeyConst.SERVER_ADDR, "10.10.10.12:8848");
properties.put(PropertyKeyConst.NAMESPACE, "SENTINEL");
final String rule = "[\n"
+ " {\n"
+ " \"resource\": \"GET:/user/getById\",\n"
+ " \"controlBehavior\": 0,\n"
+ " \"count\": 1,\n"
+ " \"grade\": 1,\n"
+ " \"limitApp\": \"default\",\n"
+ " \"strategy\": 0\n"
+ " }\n"
+ "]";
ConfigService configService = NacosFactory.createConfigService(properties);
System.out.println(configService.publishConfig(dataId, groupId, rule));
}
}
|
执行完后,Nacos中就会出现对应的配置:
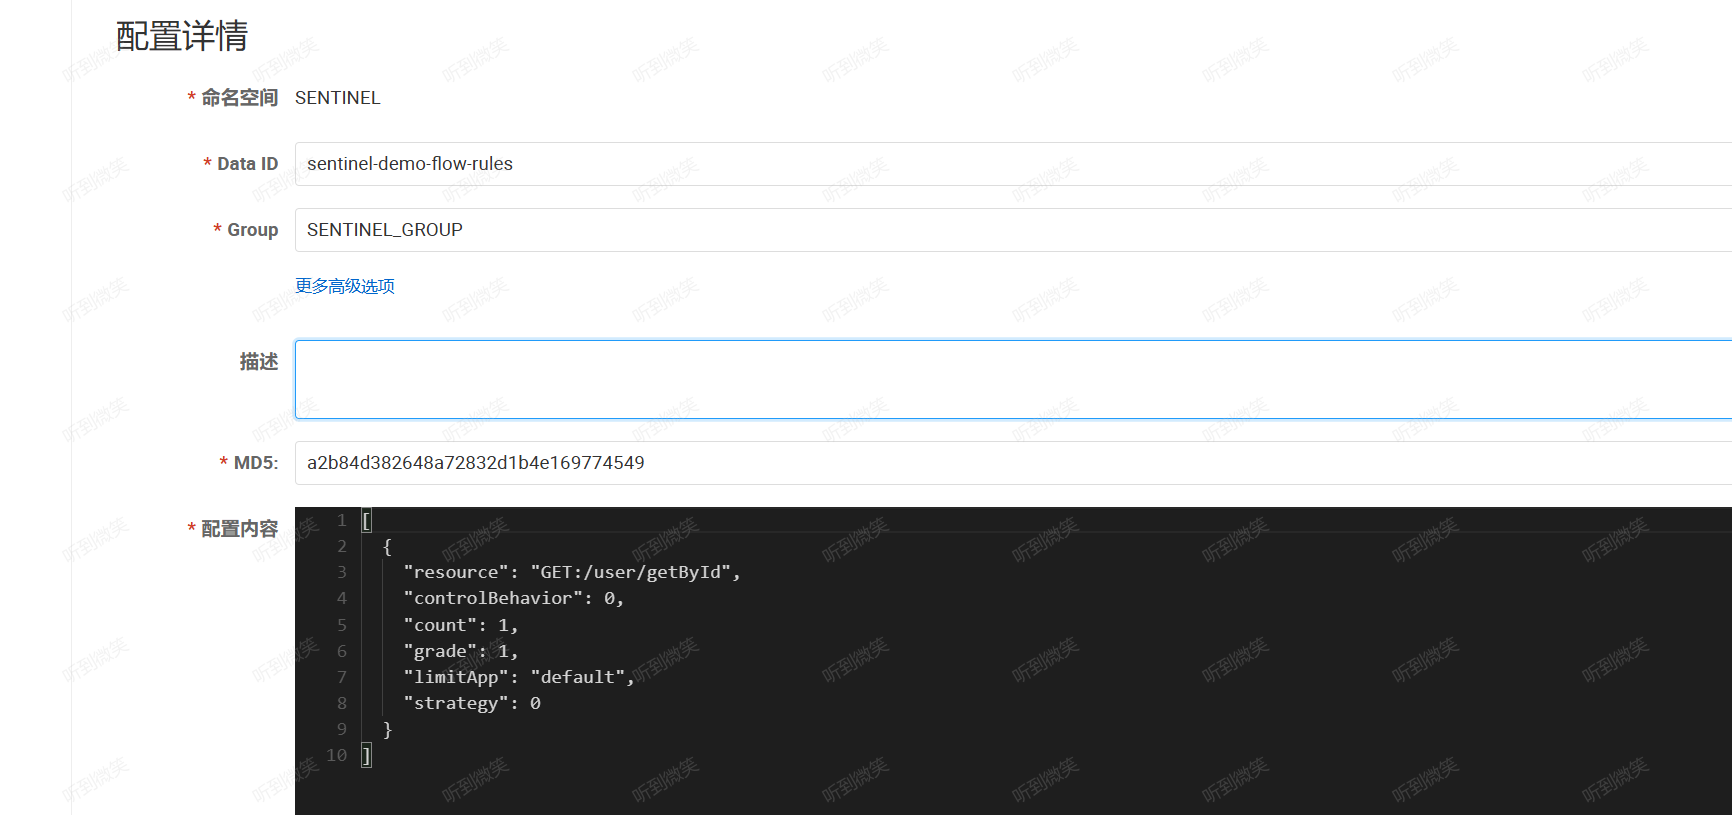
第四步:启动项目,验证规则配置是否生效
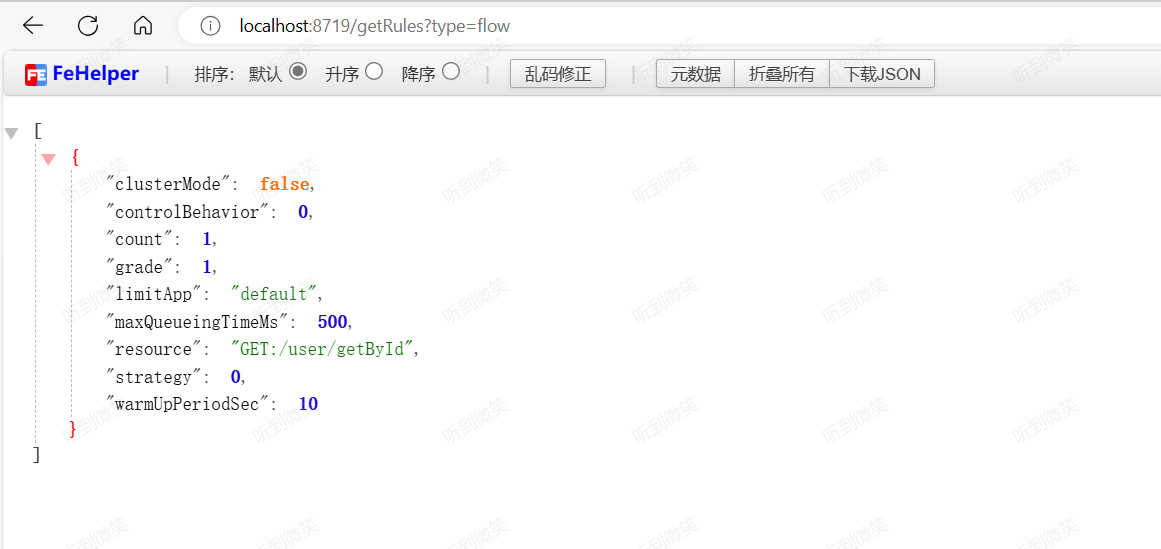
访问 http://127.0.0.1:8719/getParamRules?type=flow 即可看到业务服务内存中加载到的规则配置
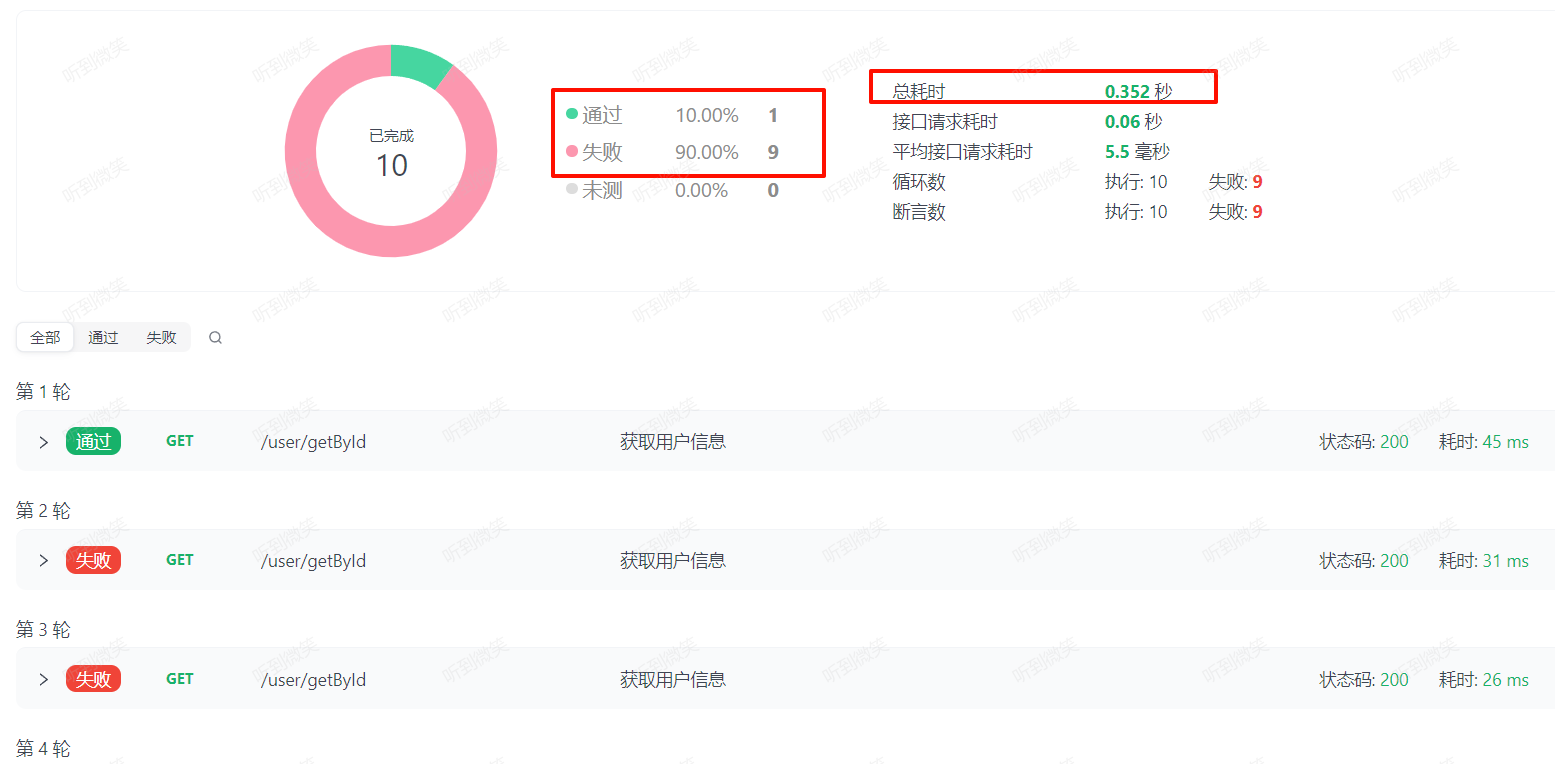
并发执行 /user/getById 接口,可以发现接口被成功限流,1s内的10次请求,只有一次成功。
三. Dashboard存在的问题
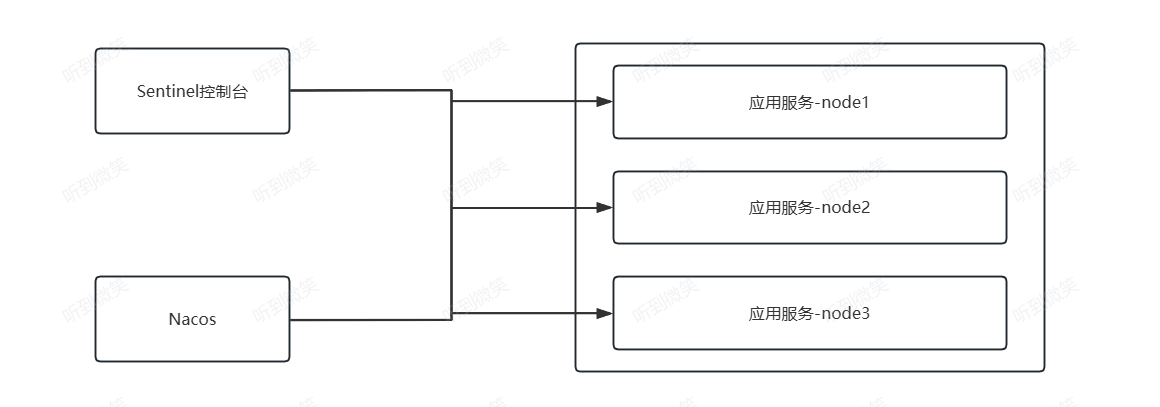
使用此方案虽然解决了配置规则配置持久化的问题,但是在Dashboard上修改配置仍然是通过业务服务暴露的接口进行的配置同步。业务服务既可以接收 Nacos 配置变更,又可以接收Dashboard的配置变更,控制台的变更的配置并没有同步到Nacos,应用重启后Sentinel控制台修改的配置仍然会全部丢失:
一个理想的情况是Sentinel控制台规则配置读取至 Nacos 而不是内存,在控制台修改/新增的配置写入Nacos,当Nacos配置发生变更时,配置进而自动同步至业务服务:
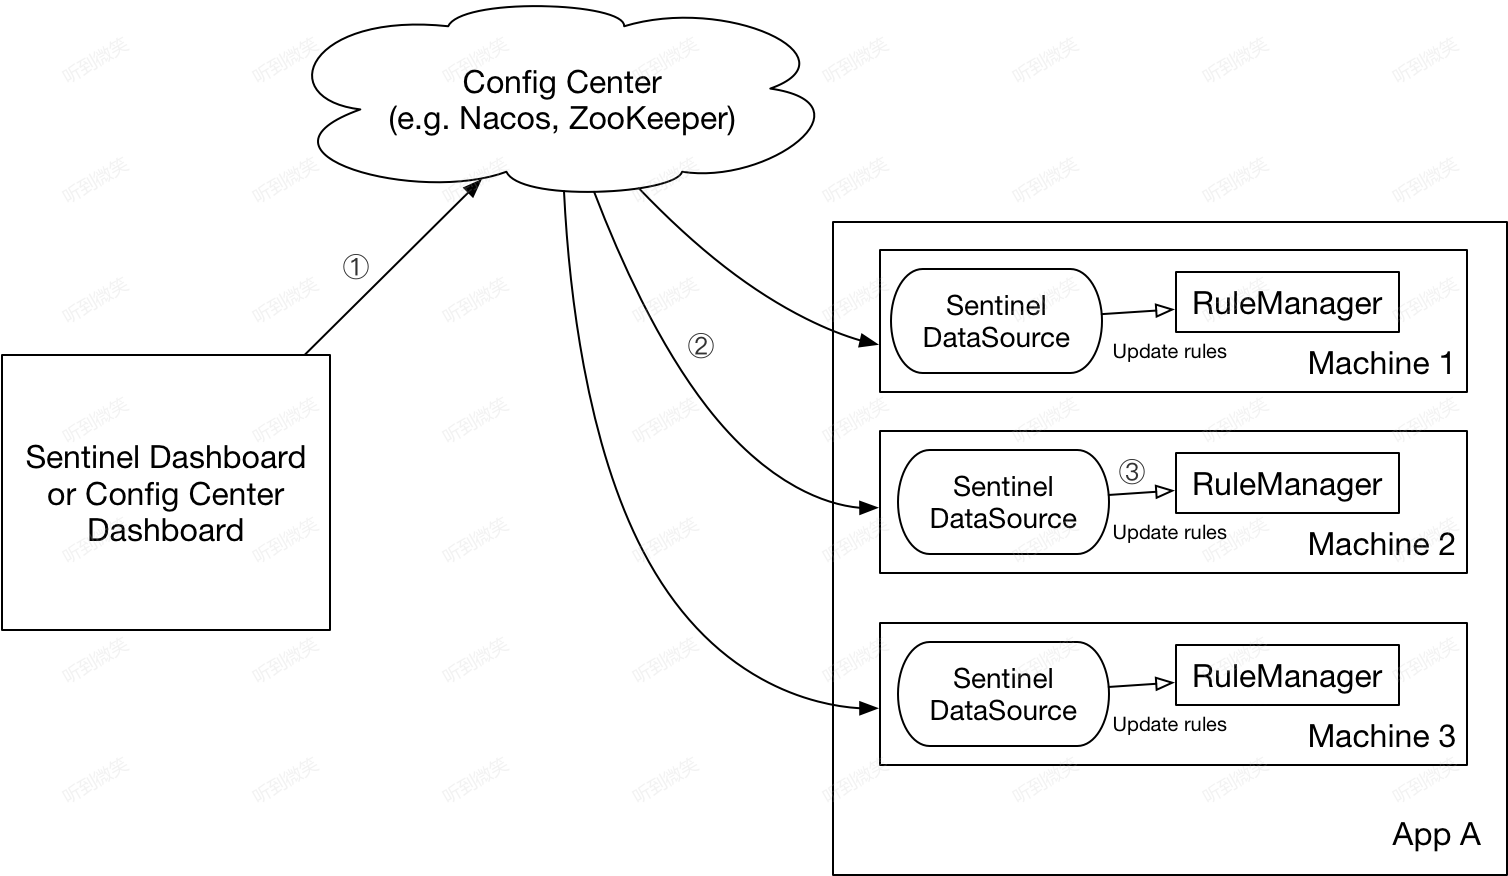
当然存储媒介可以根据情况选用别的组件:ZooKeeper, Redis, Apollo, etcd
很可惜的是,阿里官方开源的Sentinel控制台并没有实现将规则配置写入其他中间件的能力。它默认只支持将配置实时推送至业务服务,所以我们在生产环境中想要使用 Sentinel Dashboard 需要自行修改其源码,将其配置同步逻辑改为写入我们所需要的中间件中。
四. 修改Sentinel Dashboard源码
4.1 准备工作
首先通过git拉取下载源码,导入idea工程:
https://github.com/alibaba/Sentinel
本文源码修改基于 Sentinel 1.8.8 版本,所有修改的源码可参考:
https://github.com/bigcoder84/Sentinel
4.1.1 流控规则接口
Sentinel Dashboard的流控规则下的所有操作,都会调用Sentinel-Dashboard源码中的FlowControllerV1类,这个类中包含流控规则本地化的CRUD操作:
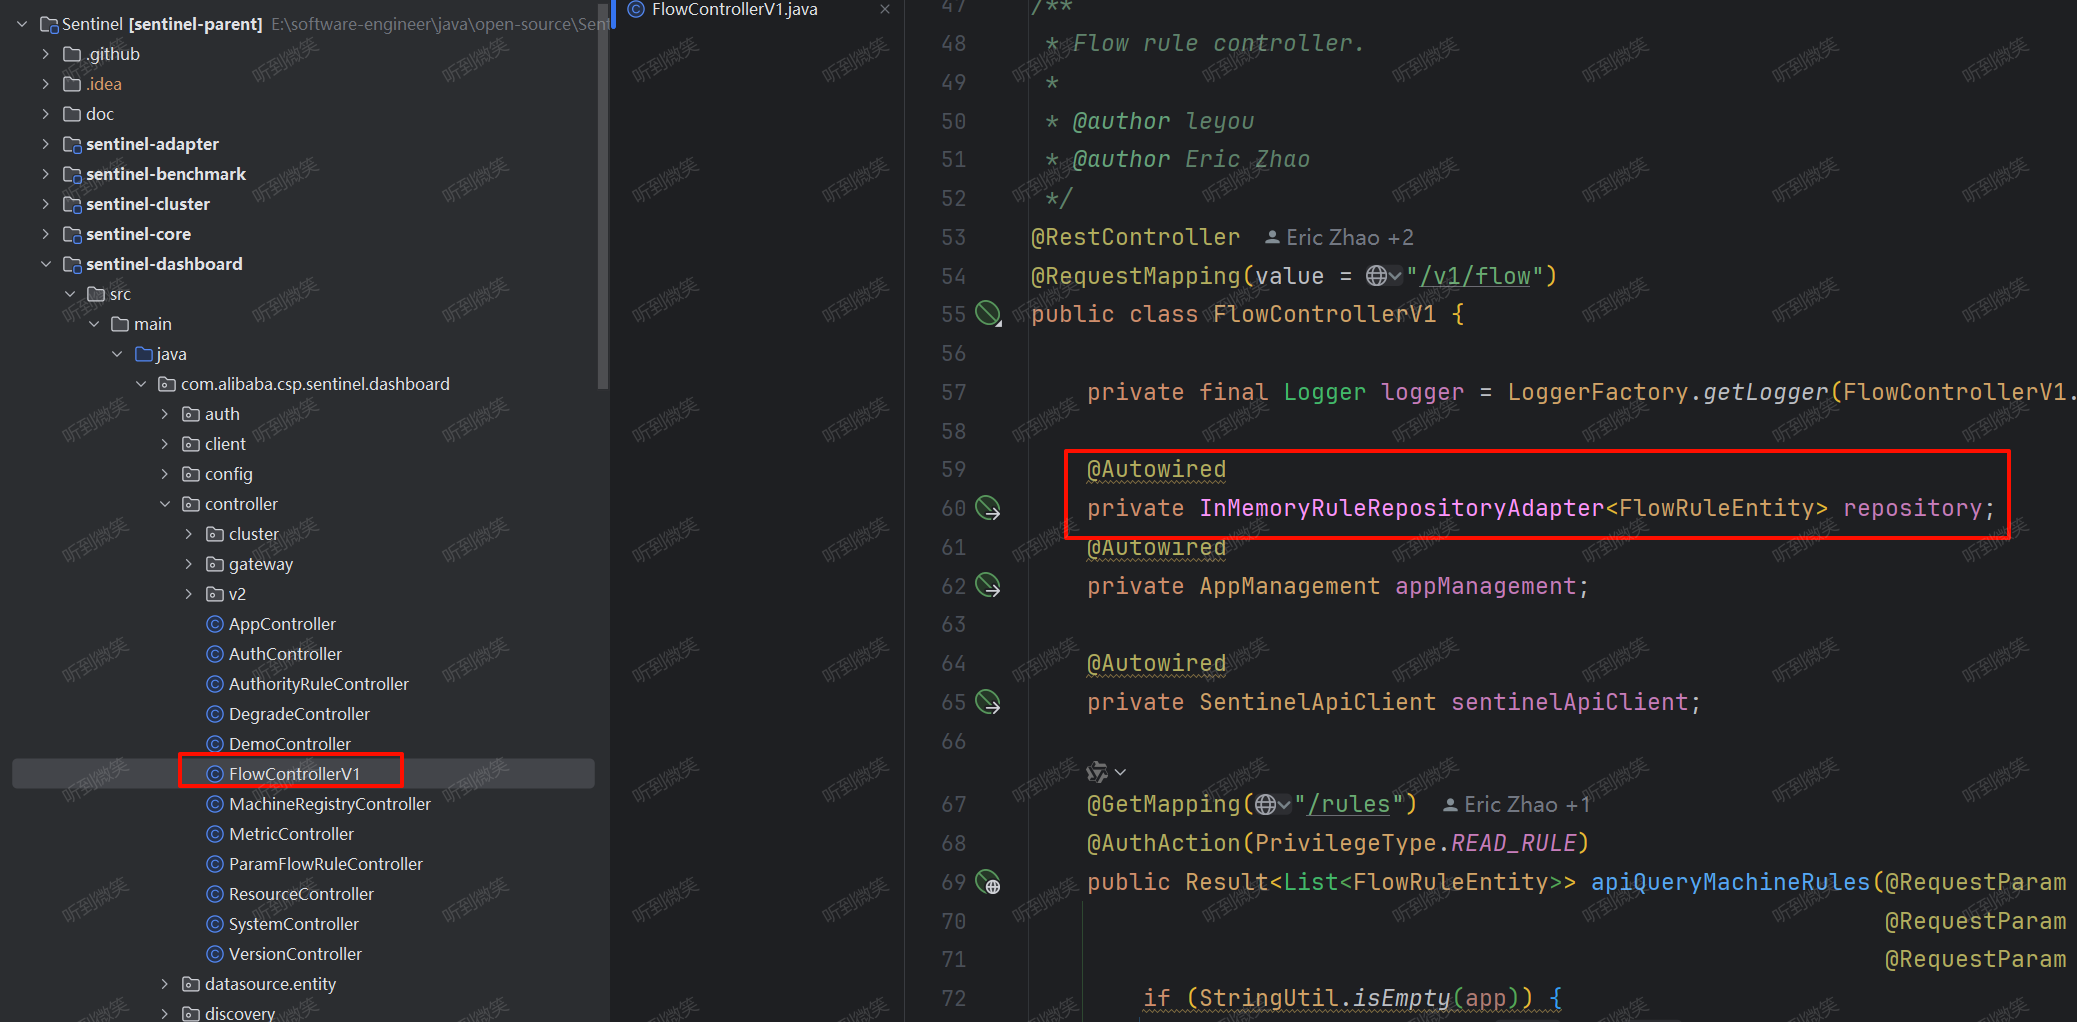
在com.alibaba.csp.sentinel.dashboard.controller.v2包下存在一个FlowControllerV2;类,这个类同样提供流控规则的CURD,与V1不同的是,它可以实现指定数据源的规则拉取和发布。
1
2
3
4
5
6
7
8
9
10
11
12
13
14
15
16
17
18
| @RestController
@RequestMapping(value = "/v2/flow")
public class FlowControllerV2 {
private final Logger logger = LoggerFactory.getLogger(FlowControllerV2.class);
@Autowired
private InMemoryRuleRepositoryAdapter<FlowRuleEntity> repository;
@Autowired
@Qualifier("flowRuleNacosProvider")
private DynamicRuleProvider<List<FlowRuleEntity>> ruleProvider;
@Autowired
@Qualifier("flowRuleNacosPublisher")
private DynamicRulePublisher<List<FlowRuleEntity>> rulePublisher;
}
|
官方说明:从 Sentinel 1.4.0 开始,我们抽取出了接口用于向远程配置中心推送规则以及拉取规则。
DynamicRuleProvider<T>: 拉取规则DynamicRulePublisher<T>: 推送规则
以 Nacos 为例,若希望使用 Nacos 作为动态规则配置中心,用户可以提取出相关的类,然后只需在 FlowControllerV2 中指定对应的 bean 即可开启 Nacos 适配
FlowControllerV2依赖两个非常重要的类
- DynamicRuleProvider:动态规则的拉取,从指定数据源中获取控制后在Sentinel Dashboard中展示。
- DynamicRulePublisher:动态规则发布,将在Sentinel Dashboard中修改的规则同步到指定数据源中。
只需要扩展这两个类,然后集成Nacos来实现Sentinel Dashboard规则同步。
4.1.2 需要改造的页面入口
簇点链路:
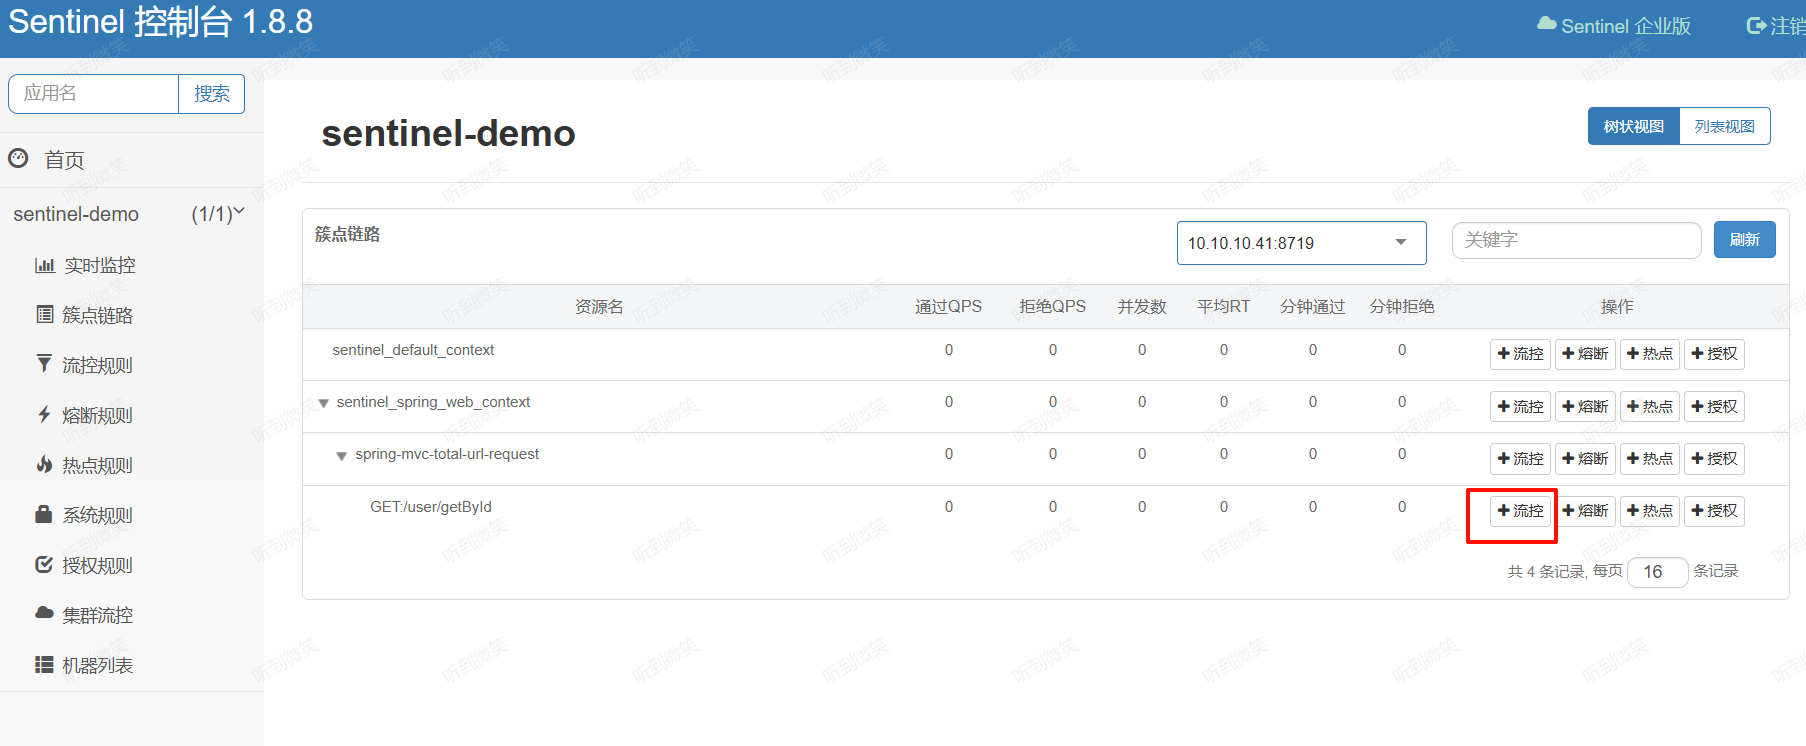
由于该页面的“流控”配置是对单节点进行配置的,所以理论上该页面的URL是不用改的
流控规则:
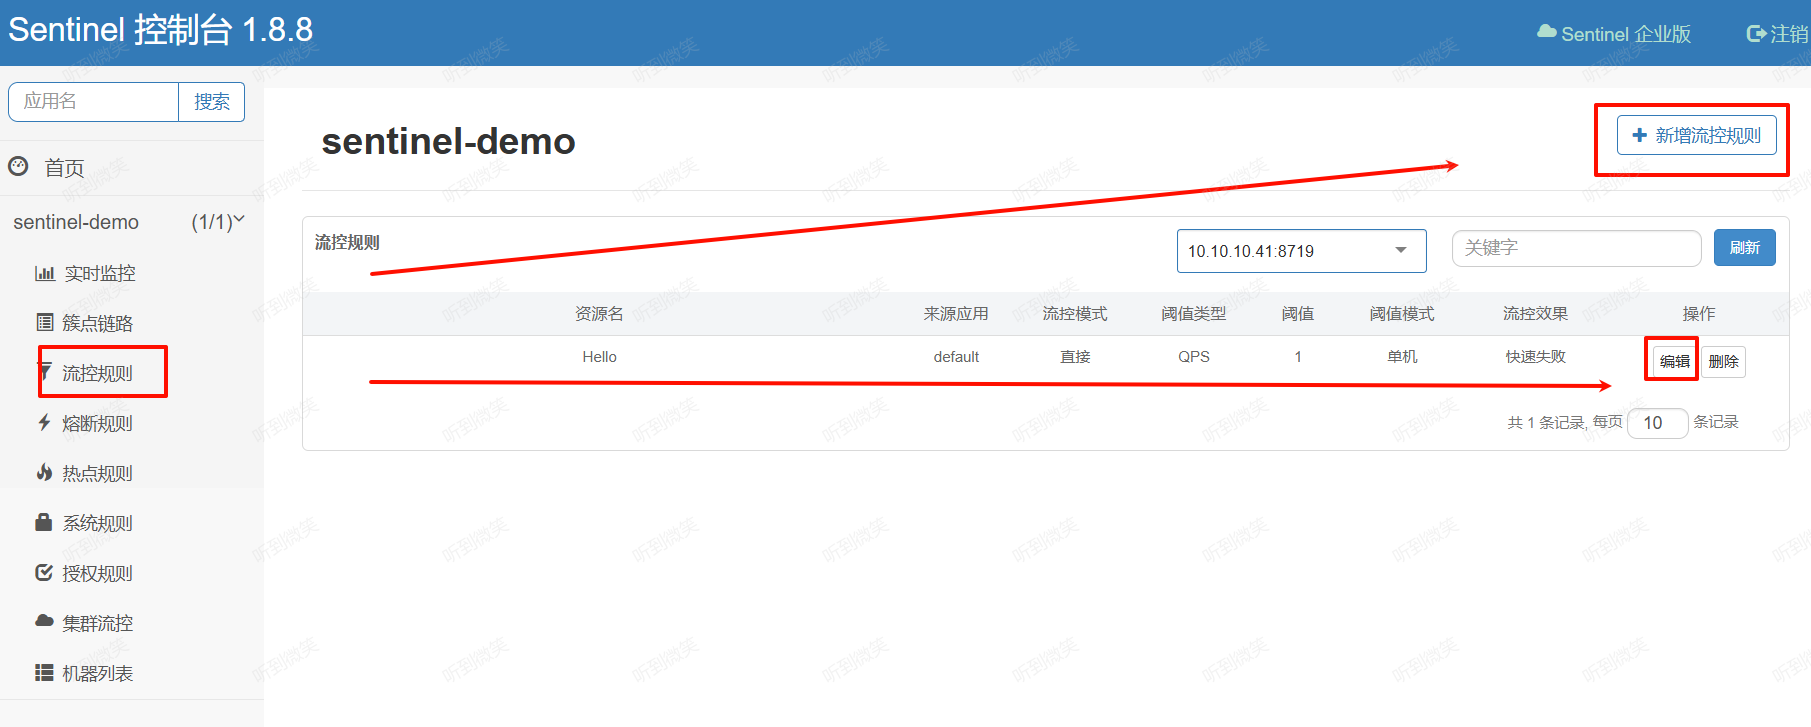
上述位置我们都需要改造对应前端代码,使之调用的接口更改为我们新的V2接口上。
4.2 源码改造
4.2.1 在pom.xml文件中去掉test scope注释
这是因为官方提供的Nacos持久化用例都是在test目录下,所以scope需要去除test,需要sentinel-datasource-nacos包的支持。之后将修改好的源码放在源码主目录下,而不是继续在test目录下。
1
2
3
4
5
| <dependency>
<groupId>com.alibaba.csp</groupId>
<artifactId>sentinel-datasource-nacos</artifactId>
</dependency>
|
4.2.2 创建Nacos配置
我们采用官方的约束,即默认 Nacos 适配的 dataId 和 groupId 约定如下:
- groupId: SENTINEL_GROUP
- 流控规则 dataId: {appName}-flow-rules,比如应用名为 appA,则 dataId 为 appA-flow-rules
所以不需要修改NacosConfigUtil.java了,但这是展示是为了步骤的完整性。
1
2
3
4
5
6
7
8
9
10
11
| package com.alibaba.csp.sentinel.dashboard.rule.nacos;
import org.springframework.boot.context.properties.ConfigurationProperties;
@ConfigurationProperties(prefix = "sentinel.nacos")
public class NacosPropertiesConfiguration {
private String serverAddr;
private String groupId = "SENTINEL_GROUP";
private String namespace;
}
|
然后配置sentinel-dashboar/resources/application.properties中配置nacos配置,以为sentinel.nacos为前缀:
1
2
3
4
|
sentinel.nacos.serverAddr=127.0.0.1:8848
sentinel.nacos.namespace=
sentinel.nacos.group-id=SENTINEL-GROUP
|
4.2.3 改造NacosConfig,创建NacosConfigService
1
2
3
4
5
6
7
8
9
10
11
12
13
14
15
16
17
18
19
20
21
22
23
24
25
26
27
28
29
30
31
32
33
34
35
36
37
| package com.alibaba.csp.sentinel.dashboard.config;
import com.alibaba.csp.sentinel.dashboard.datasource.entity.rule.FlowRuleEntity;
import com.alibaba.csp.sentinel.datasource.Converter;
import com.alibaba.fastjson.JSON;
import com.alibaba.nacos.api.PropertyKeyConst;
import com.alibaba.nacos.api.config.ConfigFactory;
import com.alibaba.nacos.api.config.ConfigService;
import java.util.List;
import java.util.Properties;
import org.springframework.boot.context.properties.EnableConfigurationProperties;
import org.springframework.context.annotation.Bean;
import org.springframework.context.annotation.Configuration;
@EnableConfigurationProperties(NacosPropertiesConfiguration.class)
@Configuration
public class NacosConfig {
@Bean
public Converter<List<FlowRuleEntity>, String> flowRuleEntityEncoder() {
return JSON::toJSONString;
}
@Bean
public Converter<String, List<FlowRuleEntity>> flowRuleEntityDecoder() {
return s -> JSON.parseArray(s, FlowRuleEntity.class);
}
@Bean
public ConfigService nacosConfigService(NacosPropertiesConfiguration nacosPropertiesConfiguration)
throws Exception {
Properties properties = new Properties();
properties.put(PropertyKeyConst.SERVER_ADDR, nacosPropertiesConfiguration.getServerAddr());
properties.put(PropertyKeyConst.NAMESPACE, nacosPropertiesConfiguration.getNamespace());
return ConfigFactory.createConfigService(properties);
}
}
|
NacosConfig主要做两件事:
1) 注入Convert转换器,将 FlowRuleEntity 使用序列化为JSON字符串,以及将JSON字符串反序列化为 FlowRuleEntity。
2) 注入Nacos配置服务ConfigService
4.2.4 实现 DynamicRulePublisher 和 DynamicRuleProvider 接口完成配置的持久化和远程加载
在 test 包下,已经有Sentinel官方的实现了,我们只需要将其拷贝至 src 目录下即可:
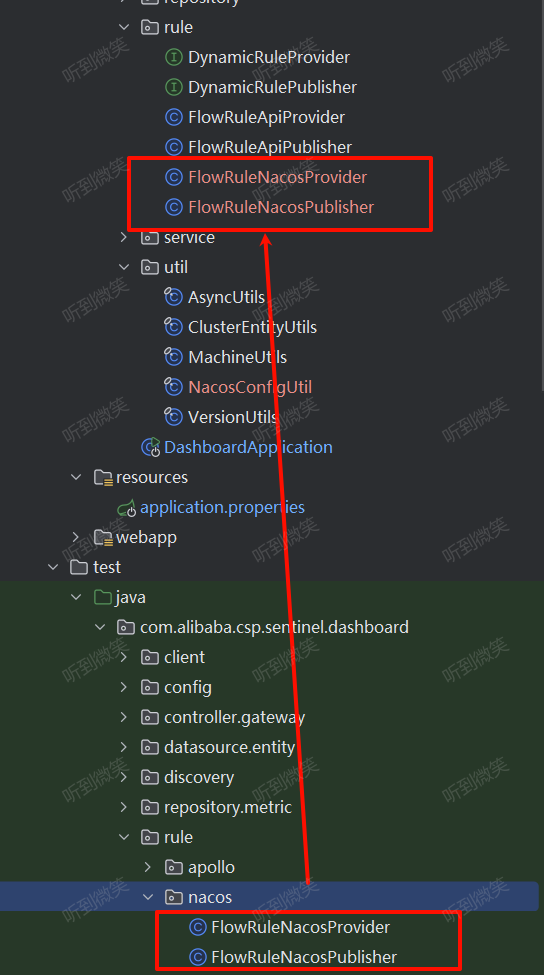
FlowRuleNacosProvider:用于从Nacos中拉取规则配置。
1
2
3
4
5
6
7
8
9
10
11
12
13
14
15
16
17
18
19
20
21
22
23
24
25
26
27
28
29
30
31
32
33
34
35
| package com.alibaba.csp.sentinel.dashboard.rule;
import com.alibaba.csp.sentinel.dashboard.datasource.entity.rule.FlowRuleEntity;
import com.alibaba.csp.sentinel.dashboard.util.NacosConfigUtil;
import com.alibaba.csp.sentinel.datasource.Converter;
import com.alibaba.csp.sentinel.util.StringUtil;
import com.alibaba.nacos.api.config.ConfigService;
import java.util.ArrayList;
import java.util.List;
import org.springframework.beans.factory.annotation.Autowired;
import org.springframework.stereotype.Component;
@Component("flowRuleNacosProvider")
public class FlowRuleNacosProvider implements DynamicRuleProvider<List<FlowRuleEntity>> {
@Autowired
private ConfigService configService;
@Autowired
private Converter<String, List<FlowRuleEntity>> converter;
@Override
public List<FlowRuleEntity> getRules(String appName) throws Exception {
String rules = configService.getConfig(appName + NacosConfigUtil.FLOW_DATA_ID_POSTFIX,
NacosConfigUtil.GROUP_ID, 3000);
if (StringUtil.isEmpty(rules)) {
return new ArrayList<>();
}
return converter.convert(rules);
}
}
|
FlowRuleNacosPublisher:用于将配置保存至Nacos中
1
2
3
4
5
6
7
8
9
10
11
12
13
14
15
16
17
18
19
20
21
22
23
24
25
26
27
28
29
30
31
32
33
| package com.alibaba.csp.sentinel.dashboard.rule;
import com.alibaba.csp.sentinel.dashboard.datasource.entity.rule.FlowRuleEntity;
import com.alibaba.csp.sentinel.dashboard.util.NacosConfigUtil;
import com.alibaba.csp.sentinel.datasource.Converter;
import com.alibaba.csp.sentinel.util.AssertUtil;
import com.alibaba.nacos.api.config.ConfigService;
import java.util.List;
import org.springframework.beans.factory.annotation.Autowired;
import org.springframework.stereotype.Component;
@Component("flowRuleNacosPublisher")
public class FlowRuleNacosPublisher implements DynamicRulePublisher<List<FlowRuleEntity>> {
@Autowired
private ConfigService configService;
@Autowired
private Converter<List<FlowRuleEntity>, String> converter;
@Override
public void publish(String app, List<FlowRuleEntity> rules) throws Exception {
AssertUtil.notEmpty(app, "app name cannot be empty");
if (rules == null) {
return;
}
configService.publishConfig(app + NacosConfigUtil.FLOW_DATA_ID_POSTFIX,
NacosConfigUtil.GROUP_ID, converter.convert(rules));
}
}
|
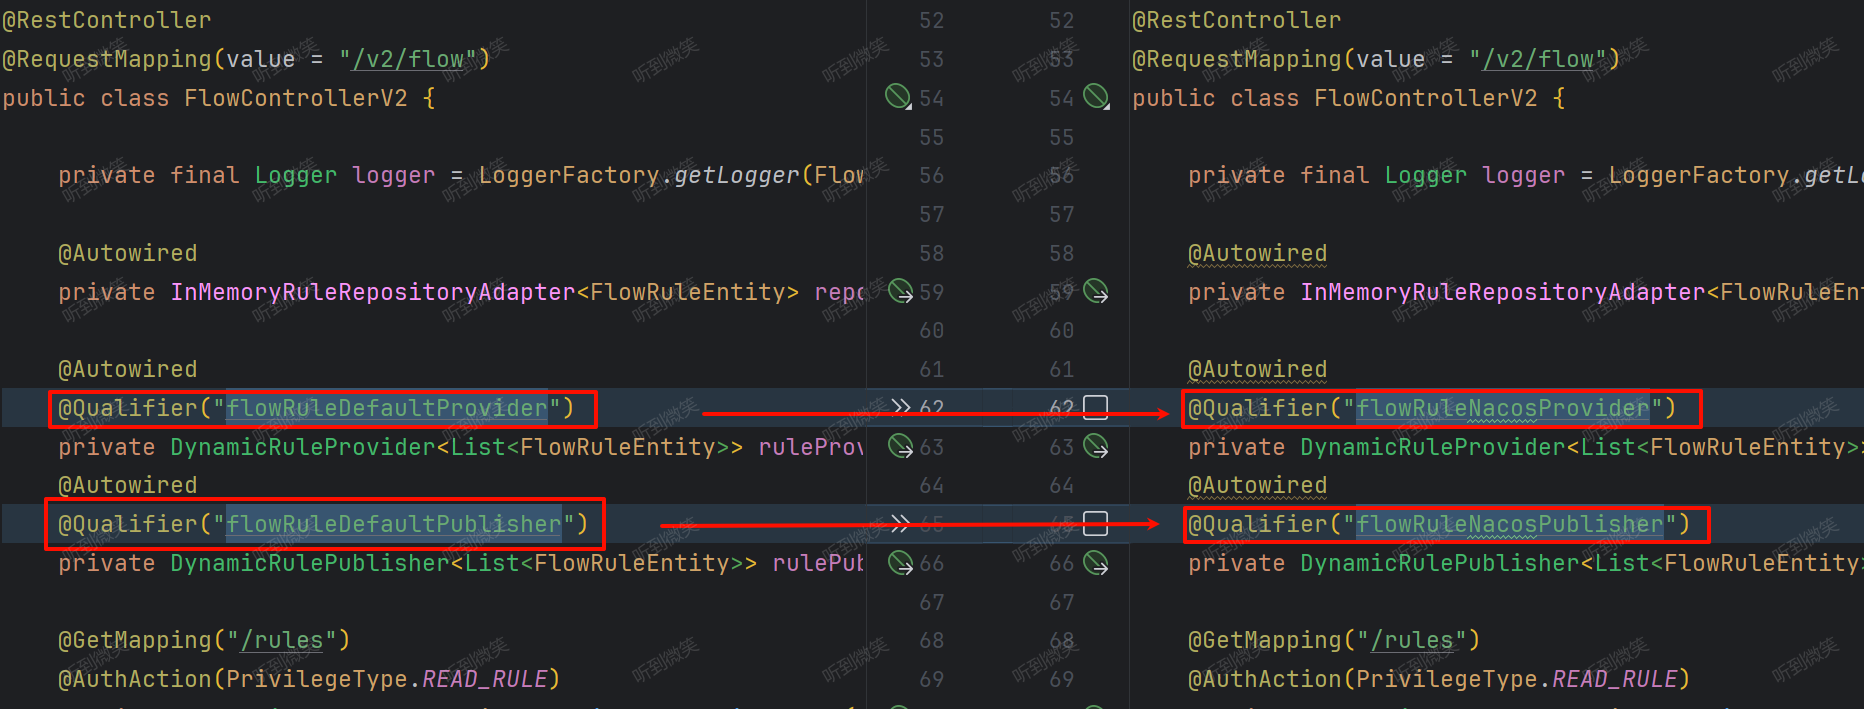
4.2.5 修改FlowControllerV2类将Nacos实现类注入进去
1
2
3
4
5
6
7
8
9
10
11
12
13
14
15
16
17
18
| @RestController
@RequestMapping(value = "/v2/flow")
public class FlowControllerV2 {
private final Logger logger = LoggerFactory.getLogger(FlowControllerV2.class);
@Autowired
private InMemoryRuleRepositoryAdapter<FlowRuleEntity> repository;
@Autowired
@Qualifier("flowRuleNacosProvider")
private DynamicRuleProvider<List<FlowRuleEntity>> ruleProvider;
@Autowired
@Qualifier("flowRuleNacosPublisher")
private DynamicRulePublisher<List<FlowRuleEntity>> rulePublisher;
}
|
到这里所有流控规则相关的后端接口都已经改造完毕,我们需要接着改造前端页面,将页面请求的接口全部换成V2新接口。
找到 resources/app/scripts/directives/sidebar/sidebar.html 文件,该文件是用来渲染左侧路由的:
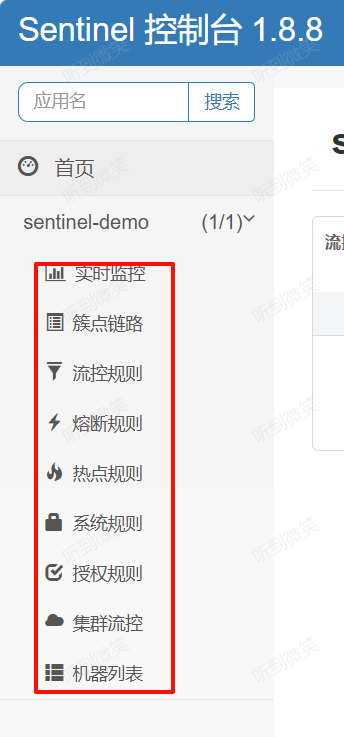
我们需要将 “流控规则” 路由跳转的页面由 app/views/flow_v1.html 更换为 app/views/flow_v2.html,因为 flow_v2.html 页面中调用的后端接口全部都是 v2接口。
修改flowV1为flow,去掉V1,这样的话会调用FlowControllerV2接口
1
2
3
4
5
6
7
8
9
|
<li ui-sref-active="active" ng-if="!entry.isGateway">
<a ui-sref="dashboard.flow({app: entry.app})">
<i class="glyphicon glyphicon-filter"></i> 流控规则</a>
</li>
|
这样就可以通过js跳转至FlowControllerV2了
1
2
3
4
5
6
7
8
9
10
11
12
13
14
15
| .state('dashboard.flow', {
templateUrl: 'app/views/flow_v2.html',
url: '/v2/flow/:app',
controller: 'FlowControllerV2',
resolve: {
loadMyFiles: ['$ocLazyLoad', function ($ocLazyLoad) {
return $ocLazyLoad.load({
name: 'sentinelDashboardApp',
files: [
'app/scripts/controllers/flow_v2.js',
]
});
}]
}
})
|
4.2.7 修改前端“簇点链路”中流控配置的接口
根据 app/scripts/directives/sidebar/sidebar.html 触点链路路由调用js方法可知,最终路由转发到了 app/views/identity.html 页面:
1
2
3
4
5
|
<li ui-sref-active="active" ng-if="!entry.isGateway">
<a ui-sref="dashboard.identity({app: entry.app})">
<i class="glyphicon glyphicon-list-alt"></i> 簇点链路</a>
</li>
|
1
2
3
4
5
6
7
8
9
10
11
12
13
14
15
16
|
.state('dashboard.identity', {
templateUrl: 'app/views/identity.html',
url: '/identity/:app',
controller: 'IdentityCtl',
resolve: {
loadMyFiles: ['$ocLazyLoad', function ($ocLazyLoad) {
return $ocLazyLoad.load({
name: 'sentinelDashboardApp',
files: [
'app/scripts/controllers/identity.js',
]
});
}]
}
})
|
在 app/views/identity.html 页面中,我们需要将“流控”弹窗的保存按钮调用的接口换成V2版本,

addNewFlowRule 方法在 app/scripts/controllers/identity.js 文件中:
1
2
3
4
5
6
7
8
9
10
11
12
13
14
15
16
17
18
19
20
21
22
23
24
25
26
27
28
29
30
31
32
33
34
35
36
37
38
39
40
41
42
43
44
45
46
47
48
| $scope.addNewFlowRule = function (resource) {
if (!$scope.macInputModel) {
return;
}
var mac = $scope.macInputModel.split(':');
flowRuleDialogScope = $scope.$new(true);
flowRuleDialogScope.currentRule = {
enable: false,
strategy: 0,
grade: 1,
controlBehavior: 0,
resource: resource,
limitApp: 'default',
clusterMode: false,
clusterConfig: {
thresholdType: 0
},
app: $scope.app,
ip: mac[0],
port: mac[1]
};
flowRuleDialogScope.flowRuleDialog = {
title: '新增流控规则',
type: 'add',
confirmBtnText: '新增',
saveAndContinueBtnText: '新增并继续添加',
showAdvanceButton: true
};
flowRuleDialogScope.saveRule = saveFlowRule;
flowRuleDialogScope.saveRuleAndContinue = saveFlowRuleAndContinue;
flowRuleDialogScope.onOpenAdvanceClick = function () {
flowRuleDialogScope.flowRuleDialog.showAdvanceButton = false;
};
flowRuleDialogScope.onCloseAdvanceClick = function () {
flowRuleDialogScope.flowRuleDialog.showAdvanceButton = true;
};
flowRuleDialog = ngDialog.open({
template: '/app/views/dialog/flow-rule-dialog.html',
width: 680,
overlay: true,
scope: flowRuleDialogScope
});
};
|
在这个方法中,会调用 saveFlowRule 方法保存流控规则:
1
2
3
4
5
6
7
8
9
10
11
12
13
14
15
16
| function saveFlowRule() {
if (!FlowService.checkRuleValid(flowRuleDialogScope.currentRule)) {
return;
}
FlowService.newRule(flowRuleDialogScope.currentRule).success(function (data) {
if (data.code === 0) {
flowRuleDialog.close();
let url = '/dashboard/flow/' + $scope.app;
$location.path(url);
} else {
alert('失败:' + data.msg);
}
}).error((data, header, config, status) => {
alert('未知错误');
});
}
|
在这个方法中,会调用 FlowService.newRule 方法发送HTTP请求新建规则,成功后会将页面重定向至 '/dashboard/flow/' + $scope.app,所以我们需要改两个地方:
将FlowService改成V2版本

将重定向页面跳转至 '/dashboard/v2/flow/' + $scope.app
4.3.8 重新打包项目
进入 sentinel-dashboard 目录,执行下列命令重新打包:
1
| mvn clean package -Dmaven.test.skip
|
4.3 测试
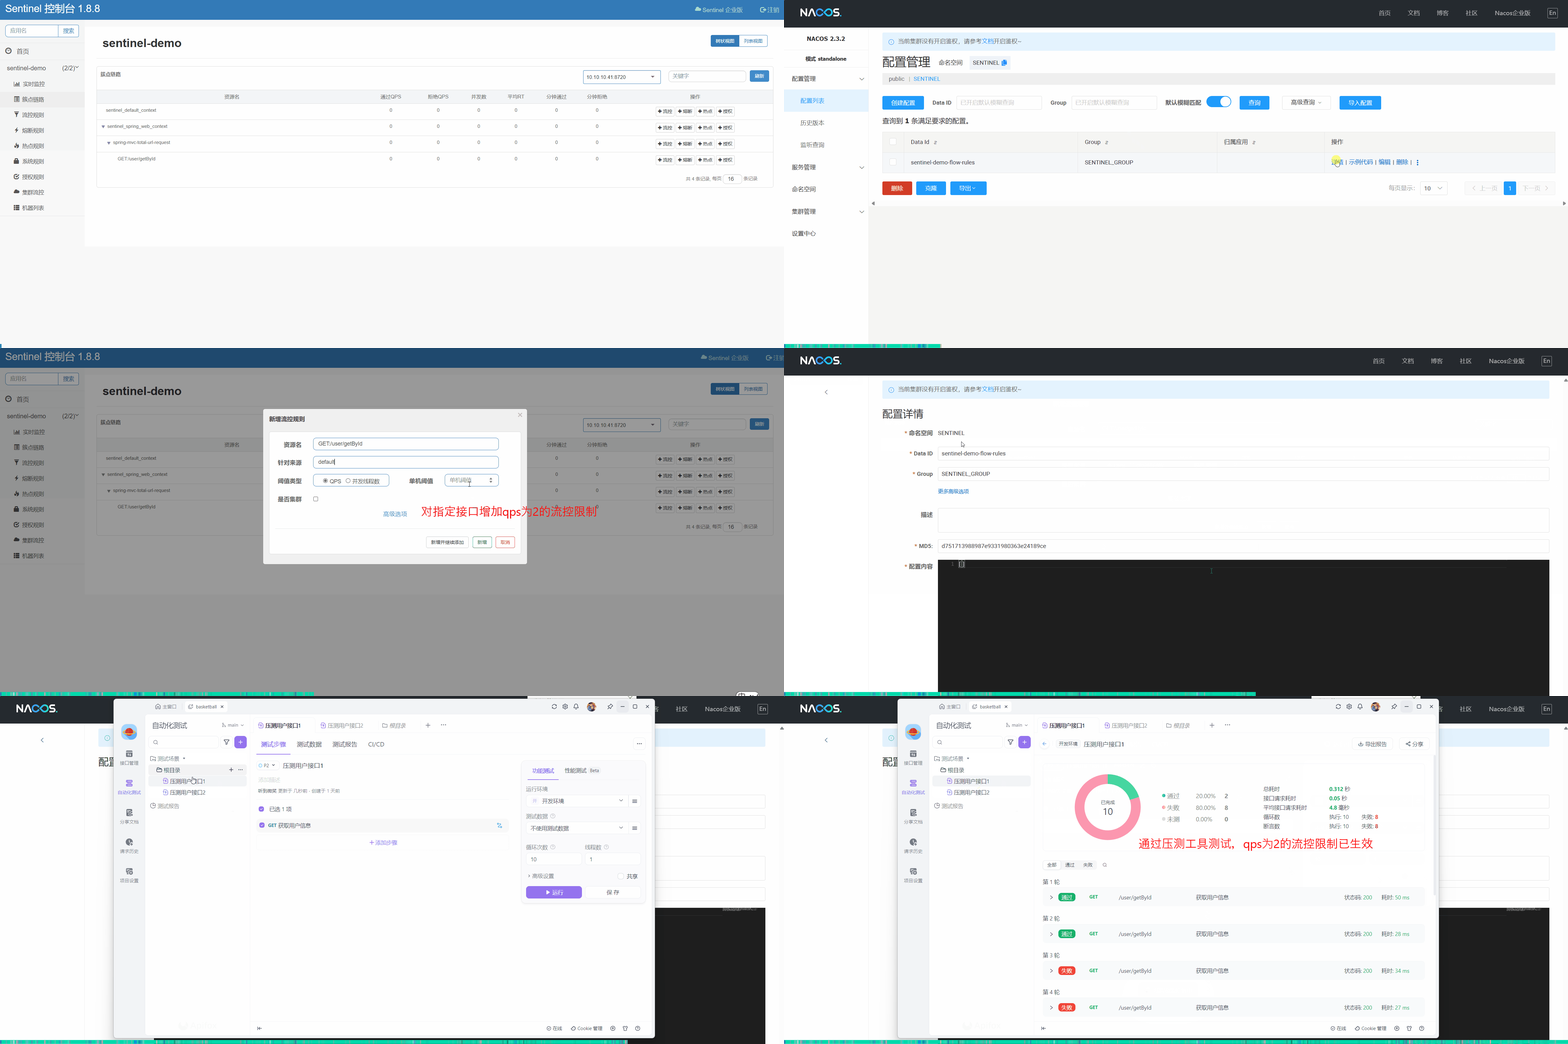
可以看到修改后的Dashboard成功将配置写入Nacos中,Nacos配置发生变更,也同时通知了订阅这些配置的客户端,使得业务服务能实时更新流控配置,即使业务服务重启,之前仍能正常从Nacos中拉取配置。
五. 总结
本文详细介绍了如何利用Nacos实现Sentinel Dashboard配置的持久化,解决了业务服务重启后配置丢失的问题。通过以下几个步骤,我们成功实现了配置的动态管理和持久化存储:
- 引入Nacos依赖:在项目中添加了
sentinel-datasource-nacos依赖,为后续集成打下基础。
- 配置自动加载:通过实现
ReadableDataSource接口,配置了规则自动从Nacos加载到Sentinel的流程。
- Nacos配置写入:通过编写
NacosConfigSender类,实现了向Nacos写入配置的功能。
- Dashboard源码改造:针对Dashboard存在的问题,通过修改前后端源码,实现了配置的持久化存储和同步更新。
通过这一系列的改造,我们不仅提高了Sentinel Dashboard的可用性和稳定性,还增强了其在生产环境中的实用性。现在,即使在业务服务重启的情况下,配置也不会丢失,确保了服务的连续性和一致性。
本文只是讲解了“流控规则”持久化的源码修改过程,如果其它模块也有持久化的需求,也可以参考此过程进行相应的源码修改。
本文参考至:
dynamic-rule-configuration | Sentinel (sentinelguard.io)
Sentinel Dashboard(基于1.8.1)流控规则持久化到Nacos——涉及部分Sentinel Dashboard源码改造 - JJian - 博客园 (cnblogs.com)


